
I love my iPad. Love. It. It’s the only device I ever bought 1st generation. I waited in line outside of an Apple Store before the crack of dawn with a few hundred friendly people. (True story!) I knew the iPad was going to be a game changer for education and I think that has been proven over the past few years. It’s an easy to use, portable, has great apps available and comes with lots of storage…until you get the dreaded STORAGE FULL message.
I was on the receiving end of that message this year. Not on one iPad, but 15 iPads! I have a set of iPad minis in my elementary music room. Imagine my reaction to seeing that message on all of my iPads? I hadn’t loaded any new apps recently. I remove all of the big Garage Band and iMovie projects once they are completed. I had them all connected to the Cloud for backups. So why was I getting the message about storage being full?
The Truth About Updates
So I’m going to tell you a little secret about iOS devices. All of those iOS updates you do? They eat up memory on your iPad. And if you iPad is a couple years old, it can be A LOT of memory. Don’t believe me?
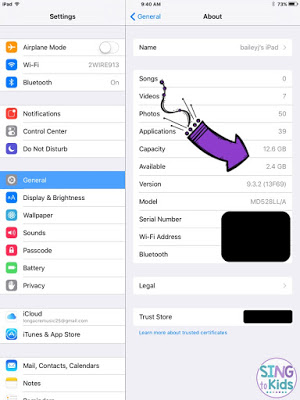
Here’s my iPad pre-reclaiming storage. 2.4GB available. (Don’t laugh at my 16GB – they’re authentic 1st generation iPad minis!)
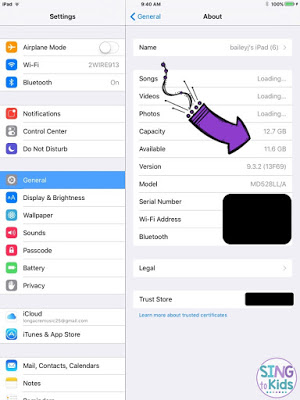
Now here’s my iPad post-reclaiming storage. Yes, you are reading that correctly. 11.6GB. That’s before are apps loaded. After apps, it was 5.0GB. So how do you do it? I’m going to walk you through it!
Reclaim Your Storage
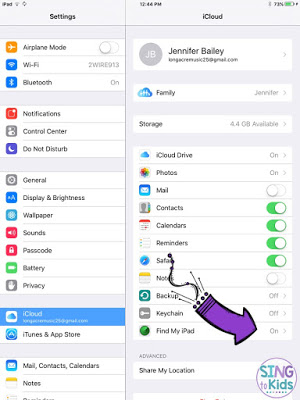
Login to your iPad and go to SETTINGS. In Settings, click on iCloud. You’ll see the icon for “Find My iPad.” You’ll need to turn that off before you can do anything. Don’t worry, we’ll turn it back on after we’re done. And if you don’t use “Find My iPad” – we need to talk. It’s a great way to track your device in case it is stolen. (It’s also a great way to see if your teen is really where they said they were, if they have an iPhone…but since I don’t have a teen yet, never mind!) While you’re in Settings, click on General and see how much storage you currently have available. Write it down somewhere so you can see how much storage you reclaimed at the end of this process.
You will be prompted to enter your Apple ID password to turn off Find My iPad. If you do not get that prompt, the next step won’t work. Now plug your iPad into your computer using your USB cord. Open up iTunes and look for the iPad icon in the upper left hand corner (it simply looks like a little rectangle – nothing special). Once you clicked on the iPad icon, a screen like this will appear.
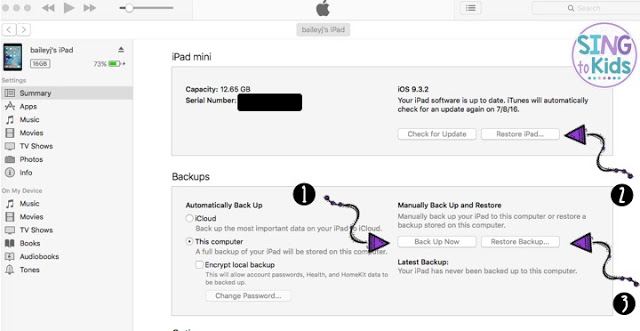
The first thing I want you to do is 1) Back Up your iPad. It will save all of your apps, folders, passwords, wifi connections, etc. onto your computer. If you don’t want to backup to your computer, then backup to the Cloud. Either way, backing up your devices is ALWAYS a good idea.
Once you’ve backed up your iPad, then click on 2) Restore iPad. This will take a little time as software will be downloaded. Go get a cup of coffee and come back in a few minutes. After the iPad has been “restored,” you will now 3) Restore Backup. This will put your iPad back just the way you like it. All of your personalized folders and all your apps in the correct folders. Again, this step will take a little time. Go top off your coffee. Your folders may appear blacked out at this point – don’t panic. They’re loading. Go get some more coffee.
Last step looks like the first. Go back to Settings. Click on iCloud. Click on Find My iPad and turn it back on. Seriously. It’s for your peace of mind. And while you’re there, click on General and see how much storage you have now.
Did you know you can do this on an iPhone or laptop too? I recently did the same thing to my MacBook and gained over 100GB in storage. Let me know if this helped you with your iOS devices! And check back later this summer. I’ll share some of my favorite apps for elementary music and how to lock down your iPad for student use!
Related Blog Posts


This worked beautifully for my phone! Thank you so much!